
Nutzung verschlüsselter Datenbankverbindungen – IT – Oberschwäbische Praxis
Dabei handelt es sich um eine bestehende Installation von NoSpamProxy (NSP) als Intranet- und Gateway-Rolle.
Bisher unterstützt der von mir verwendete Microsoft SQL Server keine verschlüsselten Datenbankverbindungen. Das wird sich jetzt bald ändern.
In der NSP-Dokumentation konnte ich dazu nichts finden. Deshalb habe ich mir auch das NoSpamProxy Command Center angeschaut. Unter Konfiguration -> NoSpamProxy-Komponenten gibt es einen Abschnitt „Datenbanken“. Dort sehe ich alle Datenbanken für die Intranet- und Gateway-Rollen. Ich habe dort jeden Eintrag überprüft und auf Ändern geklickt. Leider konnte ich keinen Parameter finden, um eine verschlüsselte Verbindung zu aktivieren.
Nachfolgend finden Sie eine Zusammenfassung der verschiedenen Aktionen für die Nachwelt.
Passen Sie bei Bedarf die Laufwerksbuchstaben und/oder Pfade zu den entsprechenden Dateien an.
Intranet-Rolle
In diesem Fall befindet sich die SQL-Datenbank für die Intranetrolle in einem Microsoft SQL Cluster (DAG). Daher wird die NoSpamProxy-Intranet-Rolle mit einem SQL-Benutzerkonto angemeldet. Dieses SQL-Benutzerkonto hat auf allen SQL-Servern in der DAG dasselbe Passwort.
1. Stoppen Sie die Windows-Dienste „NoSpamProxy – Intranet Role“ und „NoSpamProxy – Intranet Role WebApp“.
Stop-Service -Name "NoSpamProxyWebApp"
Stop-Service -Name "NoSpamProxyIntranetRole"
2. Erstellen Sie eine Sicherungskopie der Datei „C:\ProgramData\Net at Work Mail Gateway\Configuration\Intranet Role.config“.
Copy-Item -Path "C:\ProgramData\Net at Work Mail Gateway\Configuration\Intranet Role.config" -Destination "C:\ProgramData\Net at Work Mail Gateway\Configuration\Intranet Role.$(get-date -Format "yyyy-MM-dd_HH-mm-ss").config"
3. Öffnen Sie die Datei „C:\ProgramData\Net at Work Mail Gateway\Configuration\Intranet Role.config“ in einem Editor (z. B. Notepad++).
Aktuell/Vorherig:
Überarbeitet/Neu:
<connectionStrings>
    <add name="Database" connectionString="Data Source=sql01prod.lab03.sub.domain.de;Initial Catalog=NoSpamProxyIntranetRole;User Id=nospamproxy_intranet;Password=password;MultipleActiveResultSets=true;Encrypt=True" />
  </connectionStrings>
4. Speichern Sie die Änderung in der Datei „C:\ProgramData\Net at Work Mail Gateway\Configuration\Intranet Role.config“.
5. Starten Sie die Windows-Dienste neu.
Start-Service -Name "NoSpamProxyIntranetRole"
Start-Service -Name "NoSpamProxyWebApp"
Gateway-Rolle
1. Stoppen Sie den Windows-Dienst „NoSpamProxy – Gateway Role“.
Stop-Service -Name "NoSpamProxyGatewayRole"
2. Erstellen Sie eine Sicherungskopie der Datei „C:\ProgramData\Net at Work Mail Gateway\Configuration\Gateway Role.config“.
Copy-Item -Path "C:\ProgramData\Net at Work Mail Gateway\Configuration\Gateway Role.config" -Destination "C:\ProgramData\Net at Work Mail Gateway\Configuration\Gateway Role.$(get-date -Format "yyyy-MM-dd_HH-mm-ss").config"
3. Öffnen Sie die Datei „C:\ProgramData\Net at Work Mail Gateway\Configuration\Gateway Role.config“ in einem Editor (z. B. Notepad++).
Aktuell/Vorherig:

Überarbeitet/Neu:
<connectionStrings>
    <add name="NoSpamProxy" connectionString="Data Source=nspgw01a.lab03.sub.domain.de;Integrated Security=true;Initial Catalog=NoSpamProxyGatewayRole;MultipleActiveResultSets=True;Encrypt=True" />
  </connectionStrings>
4. Speichern Sie die Änderung in der Datei „C:\ProgramData\Net at Work Mail Gateway\Configuration\Gateway Role.config“.
5. Starten Sie die Windows-Dienste neu.
Start-Service -Name "NoSpamProxyGatewayRole"
Webportal-Rolle
1. Stoppen Sie die Windows-Dienste „World Wide Web Publishing Service“ und „NoSpamProxy – Large File Synchronization“.
Stop-Service -Name "W3SVC"
Stop-Service -Name "NoSpamProxyLargeFileSynchronization"
2. Erstellen Sie eine Sicherungskopie der Datei „D:\Programme\NoSpamProxy\Web Portal\App_Data\WebPortal.config“.
Copy-Item -Path "D:\Program Files\NoSpamProxy\Web Portal\App_Data\WebPortal.config" -Destination "D:\Program Files\NoSpamProxy\Web Portal\App_Data\WebPortal.$(get-date -Format "yyyy-MM-dd_HH-mm-ss").config"
3. Öffnen Sie die Datei „D:\Programme\NoSpamProxy\Web Portal\App_Data\WebPortal.config“ im Editor (z. B. Notepad++).
Aktuell/Vorherig:

Überarbeitet/Neu:
<connectionStrings>
  <add name="Database" connectionString="Data Source=nsplf01a.lab03.sub.domain.de;Integrated Security=true;Initial Catalog=NoSpamProxyWebPortal;MultipleActiveResultSets=True;Encrypt=True" />
</connectionStrings>
4. Speichern Sie die Änderung in der Datei „D:\Programme\NoSpamProxy\Web Portal\App_Data\WebPortal.config“.
5. Starten Sie die Windows-Dienste neu.
Start-Service -Name "W3SVC"
Start-Service -Name "NoSpamProxyLargeFileSynchronization"
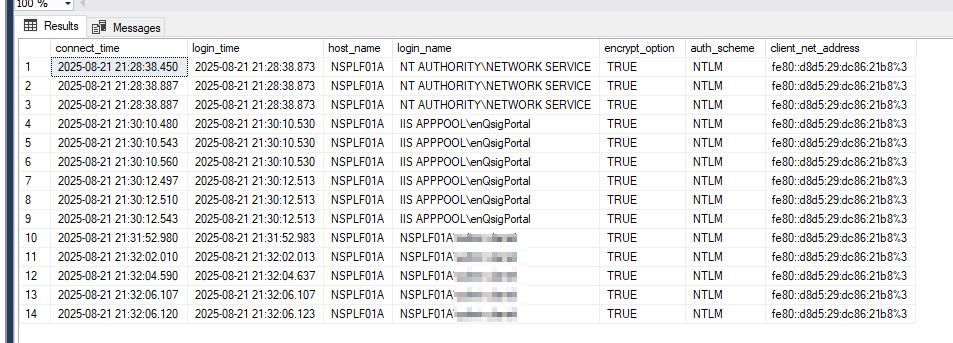
Nachfolgend finden Sie eine SQL-Abfrage, um zu überprüfen, ob SQL-Datenbankverbindungen auf „verschlüsselt“ eingestellt sind. Diese SQL-Abfrage muss auf allen SQL-Servern ausgeführt werden, auf denen die SQL-Datenbank einer NSP-Rolle vorhanden ist.
SELECT c.connect_time
 , s.login_time
 , s.host_name
 , s.login_name
 , c.encrypt_option
 , c.auth_scheme
 , c.client_net_address
FROM sys.dm_exec_connections AS c
   JOIN sys.dm_exec_sessions AS s ON c.session_id = s.session_id
Nachfolgend finden Sie ein Beispiel für das Ergebnis der obigen SQL-Abfrage auf dem SQL-Server des Webportals.
Wichtig sind die Werte in den Spalten „host_name“, „login_name“ und „encryt_option“:
Viel Spaß beim Ausprobieren. 🙂
PakarPBN
A Private Blog Network (PBN) is a collection of websites that are controlled by a single individual or organization and used primarily to build backlinks to a “money site” in order to influence its ranking in search engines such as Google. The core idea behind a PBN is based on the importance of backlinks in Google’s ranking algorithm. Since Google views backlinks as signals of authority and trust, some website owners attempt to artificially create these signals through a controlled network of sites.
In a typical PBN setup, the owner acquires expired or aged domains that already have existing authority, backlinks, and history. These domains are rebuilt with new content and hosted separately, often using different IP addresses, hosting providers, themes, and ownership details to make them appear unrelated. Within the content published on these sites, links are strategically placed that point to the main website the owner wants to rank higher. By doing this, the owner attempts to pass link equity (also known as “link juice”) from the PBN sites to the target website.
The purpose of a PBN is to give the impression that the target website is naturally earning links from multiple independent sources. If done effectively, this can temporarily improve keyword rankings, increase organic visibility, and drive more traffic from search results.
Related Posts

Cyber-Ereignisse und Sicherheitswarnungen von Accenture, Lidl, Stadtwerke Kamen Borns IT- und Windows-Blog

AIBornes IT- und Windows-Blogbeitrag zur Windows Update-Strategie von Microsoft